13 Nagios Vulnerabilities, #7 will SHOCK you!

TL;DR
We have identified a total of 13 vulnerabilities in Nagios XI and Nagios Fusion servers. Nagios is a very popular tool used to monitor IT infrastructure, and is commonly deployed by companies at their customer sites, e.g. Telcos that are monitoring their equipment across thousands of customers. When chained together, a subset of the vulnerabilities we have identified allows for a very powerful upstream attack. Namely, if we, as attackers, compromise a customer site that is being monitored using a Nagios XI server, we can compromise the Telco’s management server and every other customer that is being monitored.
To make your life easier, we have created a post-exploitation tool called SoyGun that chains the vulnerabilities together and automates the process (and hey, we didn’t even have to use machine learning or blockchain!).
Why Nagios?
In an ideal world, we would focus on researching stuff that we find interesting. Usually that would be centred around new technologies changing our lives or debunking myths around products that “solve security”. However, sometimes software just gets in the way of a job. We really don’t want to hurt it, just gently bypass it as we move from point A to point B in a network. Enter Nagios.
What is Nagios?
Nagios is a popular open-source tool for monitoring the health of IT infrastructure. While we don’t have statistics on market share, it is definitely one of the top tools out there (ask your IT admin friends, they know) alongside the likes of SolarWinds and Zabbix. Nagios has several products, and two of them will be our focus in this blog post. Nagios XI is the OG - it has been around for a while and does the actual heavy lifting of monitoring the IT infrastructure. Nagios Fusion on the other hand monitors multiple Nagios XI servers and creates pretty visualisations (it’s a bit like comparing employees doing the actual work and the manager that presents it, taking all the credit). That is why Nagios XI is found pretty much everywhere where Nagios is used, and Fusion is found in larger, more complex enterprise environments that have multiple Nagios XI servers.
Fusion works by periodically polling the XI servers that have been “fused” to the Fusion server. The polling of the XI is done over HTTP/S and it’s frequency is configurable.
The Code
While working in a certain customer environment with Nagios, we were looking at how we could maybe exploit it (gently!) to move between a monitored environment and the monitoring environment. This type of lateral movement is generally interesting as the monitoring environment is usually within the Network Operations Centre (NOC), home to an abundance of interesting systems and privileges. Since the majority of Nagios code is open source, we decided to have a quick peek at the code to see if we can spot any signs of weakness.
A few hours and several vulnerabilities later it became a question of how many vulnerabilities we actually care to identify and document, rather than how many we can find. We arbitrarily chose the number 13 as our internal challenge and went on the hunt.
Challenge Accepted
It only took a day’s worth of work to complete the challenge and identify 13 vulnerabilities. It really is sad when it takes you less time to find a vulnerability than to document it. If you are an ultra-vulnerability-nerd reading this, we have a list of all the vulnerabilities at the end of this blog post. For the rest of you, we will detail five vulnerabilities that we chain together to take control of a complete Nagios deployment and the overall impact it creates.
What are we trying to achieve?
Obviously finding vulnerabilities is great for the ego, but as we all know some vulnerabilities are pretty lame and don’t really help a real-world attack. So, while we were searching away, we did have one objective and that was to find vulnerabilities that would help us compromise a large Nagios deployment.
For example, a large telco that might have infrastructure deployed to client sites could use Nagios Fusion and Nagios XI to monitor the infrastructure at those sites. The way that would be deployed would be by having a Nagios XI deployed at each customer site and a Nagios Fusion in the telco’s network that will monitor the remote Nagios XIs.
The deployment would look something like this:
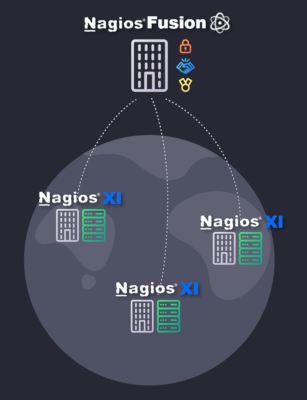
Since the Nagios XIs are deployed to the remote customer sites those sites are inherently higher risk. If we then start with the assumption that one of these customer sites has been compromised, can the attacker then attack upstream to the telco’s network and then attack all the remaining customers using Nagios?
To achieve that we need the following set of vulnerabilities and exploits:
- Gain root level code execution on the Nagios XI server at the compromised customer site using an RCE & Privilege Escalation.
- Taint the data returned to the Nagios Fusion to trigger an XSS.
- Use the session that triggered the XSS to compromise the Nagios Fusion server using an RCE and Priv. Esc.
- Gain credentials and exploit the “fused” XI servers at the remaining customer sites.

Step 1: RCE on Nagios XI server from low privilege Nagios XI user (CVE-2020-28648)
The first vulnerability we will look at is the Remote Code Execution on the Nagios XI server. This is an authenticated vulnerability but can be run from the context of a low privilege user.
The bug that allows for this vulnerability is the use of an unsanitised command line in the call to the exec() function. The exec function is a PHP built-in function that will run operating system shell commands. It takes at least one argument which is the command line string that will be executed. If we can control the command line argument passed to the exec function, we can execute arbitrary shell commands.
In the Nagios XI software this bug can be found in the function named autodiscovery_component_update_cron() found in the file nagiosxi/html/includes/components/autodiscovery/index.php

The last line of the function calls the exec function with the argument $cmd. The $cmd variable is generated by concatenating multiple strings together to form the final command line. The $tmpfile argument is used verbatim into the command line and is generated by concatenating the $id argument to the temporary directory string. Since $id is not sanitized before it is combined with $tempfile and then later used to create a command line, we can use a shell command injection to execute shell commands if we have control of the $id argument.
To control the $id argument we look at where the autodiscovery_component_update_cron() function is used. This can be found in the function named do_update_job() that is found in the file nagiosxi/html/includes/components/autodiscovery/index.php.
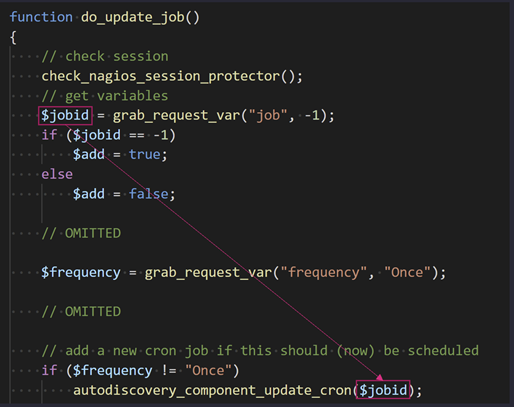
In this function we can see the argument $jobid is passed into the autodiscovery_component_update_cron() function and the $jobid is grabbed from the HTTP request variable name job. Additionally, to reach this code block our HTTP request variable for frequency must not equal Once.
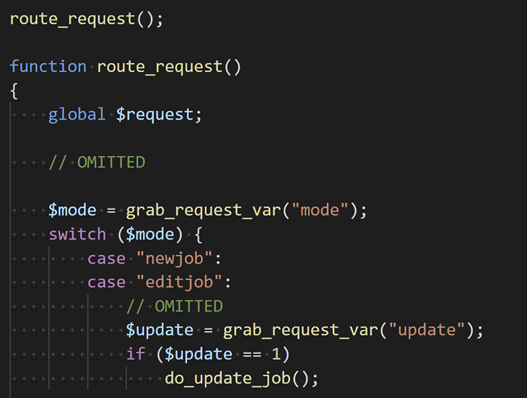
Finally, to be able to call do_update_job we need to make an HTTP request to the autodisovery index file which will then call route_request(). The route_request function will grab the request variable mode and then call the correct function based on a large switch statement. As you can see in the code block below, if the mode is either newjob or editjob and the update variable is “1” then we will call our do_update_job() function.
Lastly, the autodiscovery component is only intended for high privilege users. And we can see that the check is performed at the top of the index.php file.
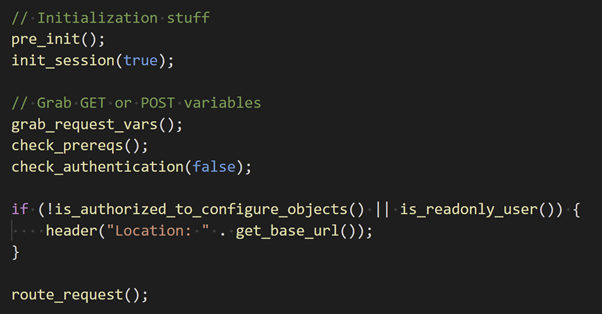
There are some initial authentication checks and then the if block will check whether the user is authorised to access this code. If the user does not have the authorisation to configure objects or is a read-only user, then the HTTP Location header is set to the base URL and the user will be redirected to the home page. However, the final mistake in this code is that after the header is set, the route_request() function will still be called even for unauthorised users since there is no call to exit() or die() to terminate code execution.
Combining this all together, with an authenticated Nagios XI dashboard session we need the following to gain code execution on the XI server:
URL = http://nagiosxi.local/includes/components/autodiscovery/index.php
Request Variables:
nsp = The NSP of your valid session
mode = newjob
update = 1
frequency = Daily
job = whoami > /tmp/hack
Exploit URL:
http://nagiosxi.local/includes/components/autodiscovery/index.php?nsp=<SESSION>mode=newjob&update=1&frequency=Daily&job=`whoami > /tmp/hack`
This exploit will execute shell commands on the XI server as the apache user that is running the web server.
Step 2: Elevate privileges to ‘root’ on Nagios XI server (CVE-2020-28910)
To elevate privileges to root we will abuse two scripts that are in the sudoers scripts: nagiosxi/scripts/repair_databases.sh and nagiosxi/scripts/components/getprofile.sh.

The getprofile.sh script can be executed as sudo from the context of both the nagios and apache users. Part of the script includes reading the last 100 lines of the file /usr/local/nagiosxi/tmp/phpmailer.log and writing it to /usr/local/nagiosxi/var/components/profile/$folder/phpmailer.log.

Since both file locations can be written to by the apache user, we can firstly change the content of the phpmailer.log file to then write data to an arbitrary location by using a symlink in place of the destination file.

By doing this, we then write data to the other sudoers script and then execute that script with sudo privileges.
The steps are as follows:
- We write malicious bash commands into the file
/usr/local/nagiosxi/tmp/phpmailer.log. - Create the folder
/usr/local/nagiosxi/var/components/profile/evil/and inside create a symlink namephpmailer.logthat points at the sudoers script/usr/local/nagiosxi/scripts/repair_databases.sh. - Execute the command
sudo /usr/local/nagiosxi/scripts/components/getprofile.sh evilthat will cause the script will write the last 100 lines of the file/usr/local/nagiosxi/tmp/phpmailer.loginto the file/usr/local/nagiosxi/scripts/repair_databases.sh. - The script
/usr/local/nagiosxi/scripts/repair_databases.shwill maintain all its previous permissions and now theapacheuser can sudo that script to execute the malicious bash commands as root.
The commands that the apache user needs to run to gain root code execution are as follows:

WARNING: This technique will damage the repair_databases.sh script. A copy should be made before using this technique to be able to restore functionality.
Attack Progress
At this point we are able gain root level access to the Nagios XI server that is located in the customer network under the attacker control. From here we want to attack up-stream to the service provider’s network.
Step 3: Trigger XSS by tainting data returned to Nagios Fusion from XI (CVE-2020-28903)
The Nagios Fusion application periodically polls the fused Nagios XI servers to get information to display on various Fusion dashboards. The security model for doing this is inherently flawed since the Nagios Fusion will trust any data returned by the fused XI server. Since the data is trusted, the Nagios Fusion will display the information on various dashboards without sanitising the data. Therefore, by tainting data returned from the XI server under our control we can trigger Cross-Site Scripting and execute JavaScript code in the context of a Fusion user.
We have chosen to taint the “Recent Alerts” data returned from the XI server to the Fusion server since this is queried and displayed by default on all Fusion dashboards. When the Fusion polls the fused XIs it stores the returned data in the database. The specific table of interest to use is the polled_extras table that stores a few different polled data sets. This table has the following columns:
- Polled_extra_id
- Polled_data_id
- Poll_key
- Extra_value
The poll_key column specifies the type of polled data. Of interest to use is the alert_list poll_key that stores the recent alert information. The extra_value column stores additional information about the polled data. In the case of the alert list, the extra value stores all the information regarding the recent alert. This data is base64 encoded and serialised. The serialised data contains an array (dictionary) of key value pairs that includes information such as the hostname, the service that caused the alert and the alert output. This is the data that is then ultimately displayed to the user in the “Recent Alerts” dashboard table. We chose to replace the output key value to pop the alert box using the HTML \<script> tags. Our extra value data is as follows:
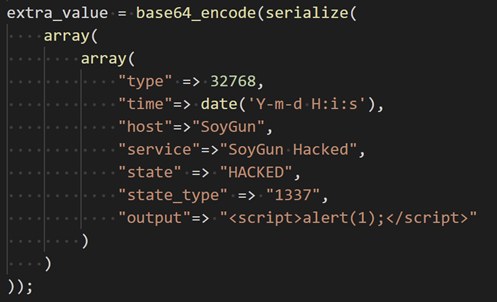
By returning this malicious blob from the XI when polled by the Fusion server we can gain JavaScript code execution in the Fusion user’s browser. To achieve this we modify the api/includes/utils-api.inc.php file on the Fused XI. After line #167 (“case ‘logentries’:”) insert the following:
return array(
    "logentries"=> array(
        "recordcount"=>1,
        "logentry" => array(
            "plugin_output"=> "<script>alert(1);</script>",
            "entry_time"=> date('Y-m-d H:i:s'),
            "host_name"=>"SoyGun",
            "logentry_type" => 32768,
            "description"=>"SoyGun Hacked",
            "state" => "HACKED",
            "state_type" => "1337"
         )
    )
);
When the fusion polls the XI, the malicious data is returned and stored in the polled_extras table which will later be displayed to a Nagios fusion user and the alert box will be popped.

Attack Progress
Through the XSS we have been able to gain code execution in the context of a Nagios Fusion user’s browser session. From here we will want an RCE to compromise the Nagios Fusion server.
Step 4: Authenticated remote code execution on Nagios Fusion (CVE-2020-28905)
Now that we have code execution from the context of a Nagios Fusion user we can exploit a vulnerability in the way Nagios Fusion handles table pagination to achieve RCE on the Fusion server. Table pagination refers to the functionality that presents table data to users in a paginated form. This allows a user to navigate the various pages and results in the browser.
The way this works in Fusion is that alongside the table data, the application will send an encoded blob of data to the user’s browser. This encoded blob contains the information required to return the correct data to the user when they request a subsequent page of the multi-page table. This encoded blob can also include PHP code that will be evaluated by the application when returned from the user.
The evaluation of the PHP code occurs in the function get_paged_table() that is found in the file nagiosfusion/html/includes/utils/pagination.inc.php.
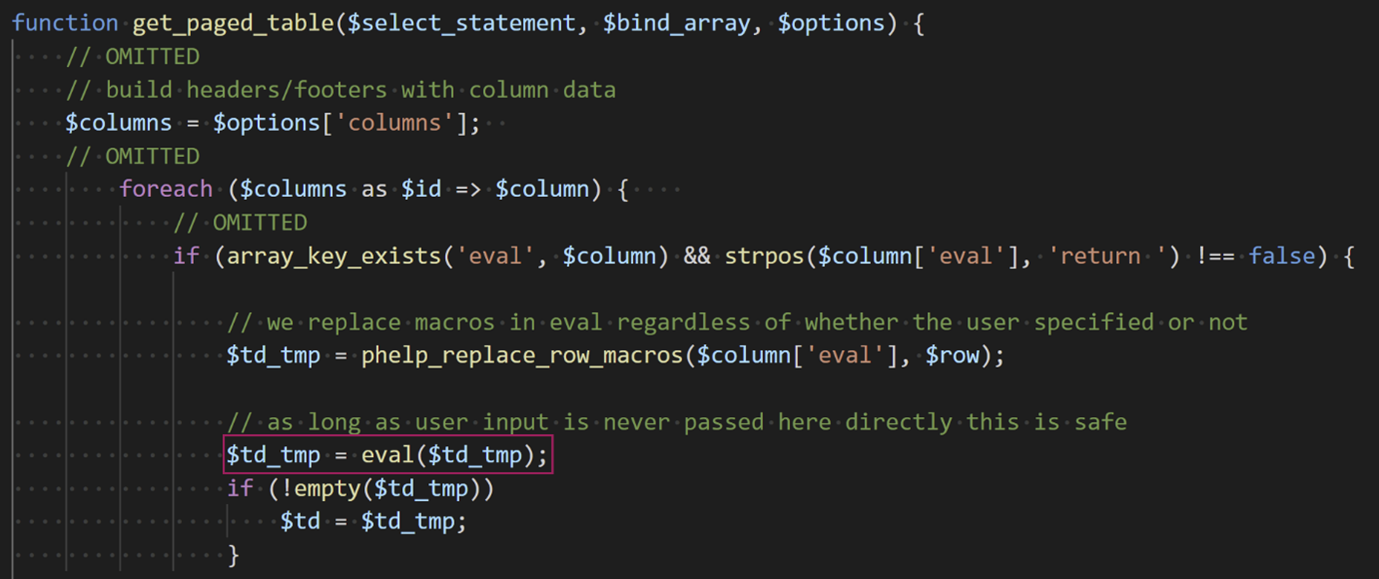
At the bottom of the code excerpt we can see the call to the PHP builtin function eval. This function takes PHP code as a string and evaluates it as PHP. The variable name is $td_tmp which is the return value of the function phelp_replace_rows_macros. This function simply replaces macros in the string found in $column[‘eval’] argument with their resulting value. This allows for the use of macros in the form “%MACRO%” which will then be evaluated and replaced in the string before being passed to the eval function. What’s important here is that this function does not modify the eval code if there are no macros. Therefore, if we can control the $column[‘eval’] value we can get PHP code execution.
The eval column comes from the $options argument to the get_paged_table function. To control this argument, we must look into the function ah_paged_table function that calls the get_paged_table function. The ah_paged_table function is located in the file nagiosfusion/html/ajaxhelper.php.
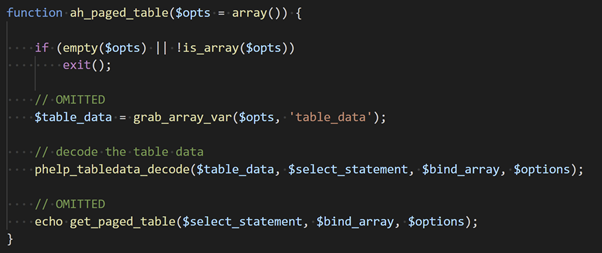
This function gets the table data from the HTTP request variable table_data and stores it in the variable $table_data. This variable is then passed into the phelp_tabledata_decode() function which will extract the select statement, bind array, and options from the table data. These three values are then passed into the get_paged_table function.
The table_data is a base64 encoded, serialised array of the following key value pairs:

The “s” key contains the select statement, the “b” key has the bind array, and the “o” contains the options. In our case we need our select statement to return one row, since each row is looped through and the eval is called for each row. We choose to select from the “users” table since even on a default installation of Nagios Fusion we know there will be at least one row in the user table for the administrator account.
Finally, to actually reach the call to ah_paged_table we must request the ajaxhelper page with the correct request variables. The ajaxhelper.php function calls the function route_request that will grab the cmd request variable and if the value of the cmd variable is paged_table the function we need is called.
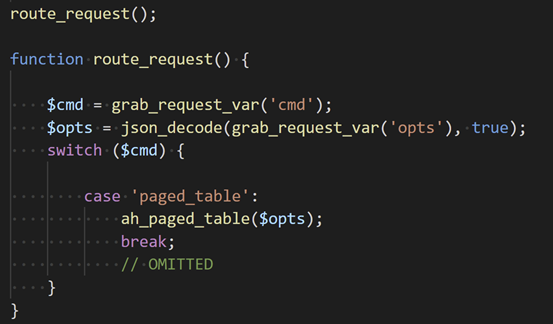
Tying that all together we simply need to make a GET request with our malicious URL and we will gain PHP code execution on the Fusion server. The request URL will look something like this:
http://nagiosfusion_url/nagiosfusion/ajaxhelper.php?cmd=paged_table&opts={"which":"first","table_data":""}Note the payload here is the base64 encoded options data from earlier.
Attack Progress
At this point we have successfully attacked upstream and executed arbitrary PHP code on the Fusion server. This code will be executed from the “apache” user context on the server, and we will need to elevate our privileges to root to take control of the Fusion server.
Step 5: Elevate privileges from apache to root using the ‘cmd_subsys.php’ (CVE-2020-28902)
With the ability to eval PHP code on the Fusion server we can run code as the apache user. As the apache user we can insert a malicious row into the fusion database commands table. This will abuse the command injection vulnerability in the cmd_subsys.php script that will execute code as the nagios user.
In particular, we abuse the vulnerability in the script cron/cmd_subsys.php that can receive commands from the database. The command we abuse is the COMMAND_CHANGE_TIMEZONE which does not sanitize the time zone data before it is being used to construct the $cmd_line variable that is later executed.
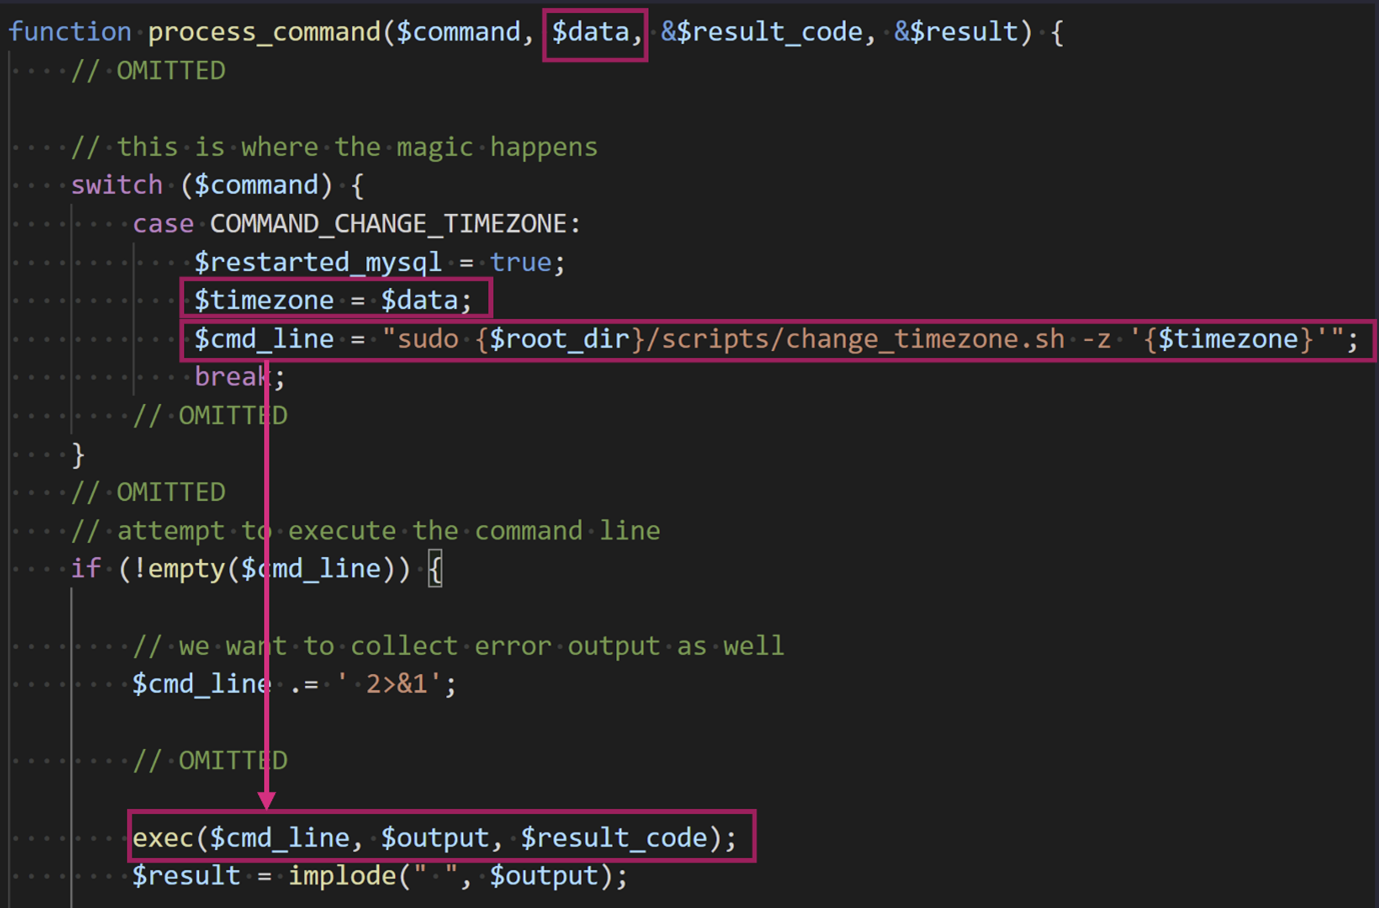
As we can see in the function process_command in the file nagiosfusion/cron/cmd_subsys.php at the bottom of the code excerpt we can see the call to exec which takes the $cmd_line argument. The $cmd_line argument is a string that is calling the change_timezone script with the timezone variable. The $timezone variable is equal to the $data argument in the process_command function. Therefore, if we can call the process_command function and control the data argument we can execute system level commands.
The process_command function is called to process rows in the command table. The command table has two columns, command and command_data. The command is the integer ID of the specific command. Of interest to us is the COMMAND_CHANGE_TIMEZONE command which has an integer value of 100. The command_data column contains the data for the command, in the case of the change timezone command this data is a string of the timezone that is later used to generate the $cmd_line. Therefore, simply enough if we insert a row into the command table with the command value of 100 and a shell injection string as the data, we will gain code execution as the Nagios user.

With this shell command injection, we can then execute arbitrary shell commands and hopefully we can now elevate our privileges to root. You might have noticed that this command line is executed as the nagios user but the script change_timezone.sh is called with sudo. Therefore, since this is an automated script, the script must be in the sudoer’s file. If we list the sudoers files we can see that it is in fact in the sudoer’s file and therefore the nagios user can run this script as root.

If we inspect the permission on the script, we can see that the nagios user can actually write to the script as well.

Therefore, the separation between root and nagios has been lost since if the nagios user can write content to the change_timezone.sh script and then execute it as root, the nagios user can therefore execute any command as root.
Therefore, we use the command subsys, change timezone vulnerability to execute system commands as nagios to modify the change_timezone.sh script and then to run the script with root privileges thereby elevating our privilege from nagios to root. The commands required to do this are as follows:

Here we simply use the sed bash command to insert the malicious code into the change_timezone.sh script, run the script with a bogus timzeone (“XXX”) and then remove the line.
Attack Progress
At this point we now have root access to the Nagios Fusion server at the provider site. From here the final step required is to exploit all the other Fused XI servers.
Step 6: Get list of “fused” XI servers and exploit them using Step 1 and 2
With root access to the Nagios Fusion server, we can extract the list of fused Nagios XI servers and exploit them using Step 1 & 2.

Attack Progress
Combining all the exploits together we have a full attack chain from one compromised customer site, attacking upstream to the service provider and then across to all the other customers. Great success!
PoC or Attack Platform
We have all the pieces required to fully compromise a Nagios Fusion / XI deployment and we have shown some simple PoCs to demonstrate the exploits. Technically, this blog post is done, and we can wrap it up, however, we got a bit carried away. Besides, what good are PoCs if you can’t use them in the real world?! So instead of stopping here we decided to go forth and build a fully-fledge attack platform we called SoyGun.
SoyGun
SoyGun is flexible and allows an attacker with Nagios XI user’s credentials and HTTP access to the Nagios XI server to take full control of a Nagios Fusion deployment.
SoyGun is written in PHP and has 4 key components:
- Command & Control (C2)
- Implant
- Payload
- DeadDrop
Command & Control (C2)
The SoyGun platform is the starting point of exploiting a Fusion deployment. It has a CLI and is the Command & Control source for all exploited servers. SoyGun can be configured to store exploited Fusion and XI server details so that a user can return to an exploited deployment with ease.
SoyGun can do the following:
- Exploit and deploy the SoyGun implant on Nagios XI servers
- Arm SoyGun implants on XI to Exploit the Fused server
- Send commands to Fusion implant to exploit fused servers
- Send execute / read file / write file commands to implants
- Ping SoyGun implants
- Uninstall SoyGun implants
SoyGun Implant
The SoyGun implant is the code that is ultimately executed as root on the exploited Fusion or XI server. The implant will determine which Nagios product it has been deployed to and will run a slightly modified implant for XI and Fusion.
The implant also contains all the data required to exploit a Nagios XI or Fusion. However, a Fusion can only be exploited from XI and vice-versa. Additionally, the implant contains the DeadDrop code to be dropped.
DeadDrop
SoyGun was built with the assumption that connectivity between Fusion and XI servers is limited and only the essential network connections are allowed. The following connections are allowed:
- User workstation to Nagios XI application using HTTP
- Nagios Fusion connecting to Nagios XI using HTTP
With the connectivity limitations, we had to get creative with our communications protocol between the attack platform, Fusion implants, and XI implants. We drew inspiration from the old-school “dead drop” spy technique to achieve two-way communications using only HTTP requests to the server. A dead drop is what you see in old spy movies where one spy drops a suitcase near a park bench and walks off, then another spy comes along and picks it up later (genius right?). So, using this theory we wrote a protocol where the Fusion can either “drop” or “pickup” messages from the HTTP server on the XI. If the XI wants to deliver a message to the Fusion, it needs to place the message in a designated location (the “park bench”) from which the Fusion knows where to pick it up. Similarly, the Fusion can “drop” messages that can then later be picked up by the XI implant.
Demo
Here is a short video showing the full flow and impact of chaining the various vulnerabilities.
Disclosure and Afterthoughts
We found and disclosed the vulnerabilities to Nagios in October 2020, and they confirmed our findings and remediated the identified issues. As we were pondering on the meaning of life and whether or not we will get T-Shirts from Nagios as a token of appreciation (we did), the SolarWinds attack became public and 3rd party attacks became the talk of town. While the SolarWinds attack was very different, as the vendor itself was targeted, it emphasised again the shift towards attacking 3rd party technology hubs, rather than a single target.
The amount of effort that was required to find these vulnerabilities and exploit them is negligible in the context of sophisticated attackers, and specifically nation-states. If we could do it as a quick side project, imagine how simple this is for people who dedicate their whole time to develop these types of exploits. Compound that with the number of libraries, tools and vendors that are present and can be leveraged in a modern network, and we have a major issue on our hands.
We expect some major changes to vetting and testing of 3rd parties (no, an ISO 27001 is NOT enough), and the implicit level of trust we give their tools and products as they are deployed right onto our most critical assets.
Full Vulnerabilities List
- CVE-2020-28903 - XSS in Nagios XI when attacker has control over fused server.
- CVE-2020-28905 - Nagios Fusion authenticated remote code execution (from the context of low-privileges user).
- CVE-2020-28902 - Nagios Fusion privilege escalation from apache to nagios via command injection on timezone parameter in cmd_subsys.php.
- CVE-2020-28901 - Nagios Fusion privilege escalation from apache to nagios via command injection on component_dir parameter in cmd_subsys.php.
- CVE-2020-28904 - Nagios Fusion privilege escalation from apache to nagios via installation of malicious component.
- CVE-2020-28900 - Nagios Fusion and XI privilege escalation from nagios to root via upgrade_to_latest.sh.
- CVE-2020-28907 - Nagios Fusion privilege escalation from apache to root via upgrade_to_latest.sh and modification of proxy config.
- CVE-2020-28906 - Nagios Fusion and XI privilege escalation from nagios to root via modification of fusion-sys.cfg / xi-sys.cfg.
- CVE-2020-28909 - Nagios Fusion privilege escalation from nagios to root via modification of scripts that can execute as sudo.
- CVE-2020-28908 - Nagios Fusion privilege escalation from apache to nagios via command injection (caused by poor sanitization) in cmd_subsys.php.
- CVE-2020-28911 - Nagios Fusion information disclosure - low privileges user can discover passwords used to authenticate to fused servers.
- CVE-2020-28648 - Nagios XI authenticated remote code execution (from the context of low-privileges user).
- CVE-2020-28910 - Nagios XI getprofile.sh privilege escalation.
